Install skins
Instructions
A "Skin" is a package of template pages and graphics. This package changes the appearance of the user interface, the "look & feel" of your application.
 Attention! Packages may not include executable files or PHP files. Take care of this before you proceed with the installation.
Following files and directories may be included in a package.
- "skins/name.config"
- "skins/name/<html-templates>"
- "skins/name/data/<graphics>"
To install an archive you got from the internet, do as follows:
- Unpack the archive, which contains the plug-in to the skin directory of the application. (Default: "skins/")
- Then, upload your changes to the Internet with your FTP program.
- Open your administration menu. Make sure you are logged in as the administrator and the expert mode is enabled.
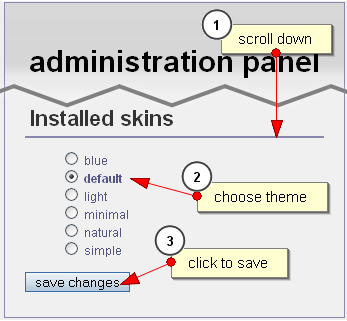
- In the right column, you should be able to read the name of the package in the section "installed skins".
- Select the desired package by clicking the radio button (round button), next to the name. (see figure)
- When you are done, click "Save changes".

Figure: Choosing a skin (administrator's menu / expert-mode)
The changes will take effect, the next time you start the program. If the settings do not apply as expected, flush the server's cache by clicking the button in the administrator's menu and try again.
Troubleshooting
- If you are not able to see a menu "installed skins", the probably the expert mode is not activated
- If you can't activate the expert mode, check whether the access rights have correctly been set during the installation of the program. Maybe a profile file in the directory "config/profiles" is write-protected.
- If you see the menu, but not the radio button, you do not have sufficient rights for the installation. Ask an administrator to install it for you.
 Table of Contents
 Extensions
![]() Attention! Packages may not include executable files or PHP files. Take care of this before you proceed with the installation.
Attention! Packages may not include executable files or PHP files. Take care of this before you proceed with the installation.
 Thomas Meyer, www.yanaframework.net