Table of ContentsExtensions
This plug-in enables you to add a guestbook to your web site. Using this software, your visitors may leave messages for you. These messages are visible to you and other visitors. The software automatically informs you on new entries by sending you an e-mail. In addition the latest messages are also available as RSS-feed.
 Notice to PHP newbies: This software requires PHP and thus will possibly not run on your local hard disk, but only on the internet. To be able to run this software on your web site your provider needs to support PHP. If in doubt, ask your provider.
Guestbook entries may be stored optionally as text files or in a database.
To be able to run this script you need webspace with support for PHP and FTP access. In addition a FTP client is needed to upload files. To use a database to save entries you need to have the PEAR-DB library installed.
Step-by-step guide:
Note: The following steps are required only if, entries are to be saved in a database, rather than a text file. 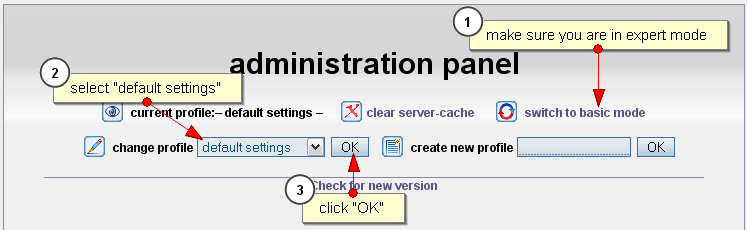
Figure: Choosing the profile "Basic settings"
These settings automatically apply to all profiles, unless a profile overwrites these basic settings. In addition they apply to all newly created profiles. Caution: Some plug-ins may have options, either which are only visible in the basic settings, or which are visible everywhere EXCEPT in the basic settings.
 Note: Basic settings are meant to be "Default values", that automatically apply to all books, unless overwritten.
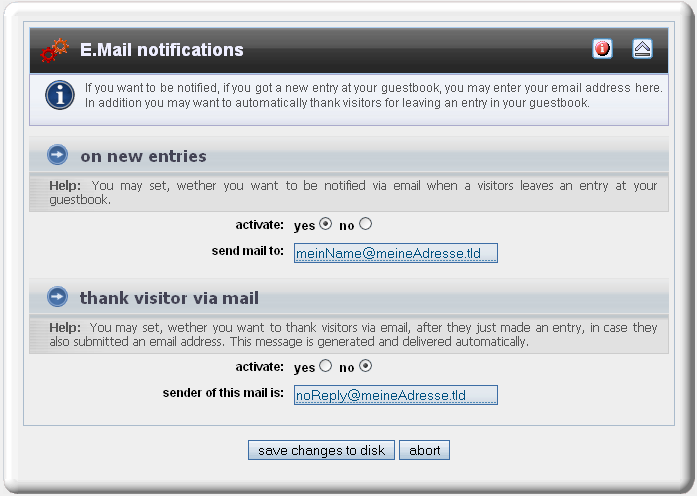
In the administrator's menu click "Guestbook Setup". In the section "E. mail notifications" you can choose whether you are to be informed on new entries automatically by e-mail. This option is disabled by default. To activate it, click on the button with the text "activate" and enter your e-mail address in the box "send mail to". (see figure)
In order to save your changes, click on "Save changes", or click on "Abort" to return to the administration menu without changes.
The program usually sets up new guests books when needed. When doing this, basic settings are used, which apply to all books equally (see above) If you want a guest book to use very special profile of settings, which differ from the basic settings of all the other guestbooks, then you can use this option.
Link to your new guestbook like this:
index.php?id=FOO&action=guestbook_read_read
Where instead of FOO you enter your guestbook's name.
default ". (see figure) 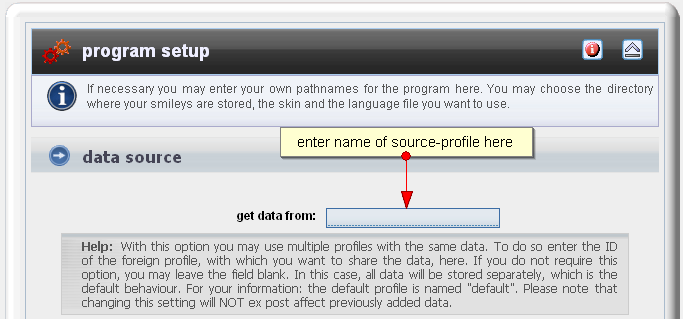
Figure: Using data from another profile
Do the same for any other layouts you want to create.
Link to a layout as you would do with a real guest book:
index.php?id=FOO&action=guestbook_read_read
Where instead of FOO you enter your layout's name.
To protect you guestbook from being flooded with unwanted advertisement there are several security options included. Via the menu "Guestbook Setup" you may restrict the number of entries per person to a number of your choice.
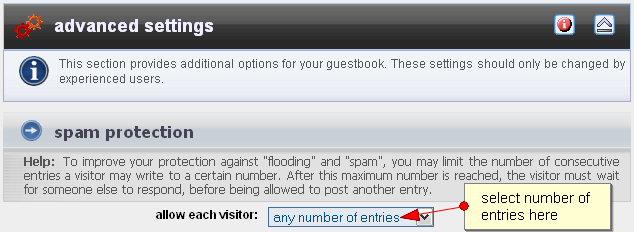
Figure: Spam protection
Additional security settings can be made by using the plug-in "Anti-Spam". These can be edited by using the menu option "Anti-Spam Setup".
To see the full list, insert new fields, or delete old fields, open the appropriate structure file "config/db/guestbook.config".
| Column | Type | Mandatory | Default value | Description |
|---|---|---|---|---|
| GUESTBOOK_ID | integer | yes | <auto increment> | Primary key |
| PROFILE_ID | string | no | default | Foreign key to the appropriate profile. |
| GUESTBOOK_IP | string | no | <remote address> | IP of the author of the current entry |
| GUESTBOOK_NAME | string | yes | n/a | Name of the author |
| GUESTBOOK_MESSAGE | string | yes | n/a | message text |
| GUESTBOOK_MAIL | string | no | null | Mail address of the author of an entry. |
| GUESTBOOK_DATE | integer | yes | <current timestamp> | Date of creation. |
| GUESTBOOK_COMMENT | string | no | null | Commentary by the webmaster (if any). |
 Thomas Meyer, www.yanaframework.net
 Install language packs