 Table of ContentsDeveloper's Manual
The interface of a plug-in is a stored as a file with the extension "*.config". You can find these files in the directory "plugins/".
/* see the interface description plugins/foo.config */

<INTERFACE>
	<name of action>

		<TYPE>primary|default|write|read|security|config</TYPE>
/* Type:
 - "primary"  for core processes of a main program
 - "security" for security functions, such as the testing of passwords
 - "config"   for functions to edit configuration files
 - "write"   for write access to the file system or database
 - "read"     for read access to the file system or database
 - "default"  is intended for developers who are undecided where to put the action
*/
		<MODE>0|1</MODE>
/* Mode:
 - 0 (default) normal operating mode
 - 1           start action in default configuration ("safe mode")
               (for safety critical tasks)
*/
		<TEMPLATE>Id of template (e.g. INDEX)</TEMPLATE>
		<INSERT>Id of template (e.g. MY_TEMPLATE)</INSERT>
/* Templates:
 Names of templates for the output
 - the file named in "INSERT" will be embedded in the "TEMPLATE"-file
 - "TEMPLATE" is a static "frame" around the content, default value is INDEX"
 - The name of the template is the name defined in the skin file.
   By comparison open, e.g. the file skins/default/default.config .
 - The special template "NULL" will prevent any output from being generated
   (Very convenient if you don't intend to output a HTML file but a file, e.g. a PNG graphics file)
 - The special template "MESSAGE" creates a text message.
*/

		<PERMISSION>1</PERMISSION>
/* Permission:
 Specifies which minimum permissions are required for a user,
 to be able to call this action. The value is between 0 and 100, where
 the value 0 = "no restriction". You can temporarily deactivate a function
 by setting the property "permission" to -1. In this case, nobody can
 trigger this action.
*/
		<ONSUCCESS>
			<TEXT>Name of text message</TEXT>
			<GOTO>Name of action</GOTO>
		</ONSUCCESS>
		<ONERROR>
			<TEXT>Name of text message</TEXT>
			<GOTO>Name of action</GOTO>
		</ONERROR>
/* OnSuccess / OnError:
 You may specify an action to automatically go to,
 when the current action was successful, or an error occurred.

 Additionally you can indicate a text message, which is to be shown.
 You find a list of the text messages in the file "languages/en/message.config".
*/
	</name of action>

/* an example */
        <foo>
		<TYPE>write</TYPE>
		<MODE>0</MODE>
		<TEMPLATE>MESSAGE</TEMPLATE>
		<PERMISSION>75</PERMISSION>
		<ONSUCCESS>
			<GOTO>foo_read</GOTO>
		</ONSUCCESS>
		<ONERROR>
			<GOTO>foo_edit</GOTO>
		</ONERROR>
        <foo>
</INTERFACE>

the plug-in class plugins/foo/plugin.php:
<?php
class plugin_foo extends plugin
{

    /* ... */

    function foo($ARGS)
    {
        /* source code of action "foo" */
        if ($test) {
            return true; /* true = SUCCESS -> go to action "foo_read" */
        } else {
            return false; /* false = ERROR -> go to action "foo_edit" */
        }
    }

    function foo_edit($ARGS)
    {
        /* source code of action "foo_edit" */
    }

    function foo_read($ARGS)
    {
        /* source code of action "foo_read" */
    }

}
?>
First you should have a basic structure generated for your new plug-in, with the help of the SDK. This makes the adaptation of the source code a lot simpler.
For adding a new action two things are necessary. On the one hand the source code and on the other hand, registration of this new action in the framework, by publishing the interface. This will allow the framework and all other plug-ins to find and use the action.
Note: All public functions of the class make a function available, which is called likewise, like the function. For example: in order to add an action "foo", you provide a function "foo()". You may run this by using the URL: "index.php?action=foo".
In the following example pay attention to the "Hot Spots". These mark places in the skeleton of the application, where you can fill in your own code.
<?php
class plugin_example extends plugin
{

    function plugin_example($plugin_name)
    {
        settype($plugin_name,"string");
        global $YANA;

        $this->plugin_name = $plugin_name;
    }

    /**
     * Default event handler
     *
     * @param  string $event name of the called event in lower-case
     * @param  array  $ARGS  array of params passed to the function
     * @return boolean
     */
    function _default($event, $ARGS)
    {
        settype($event, "string");
        settype($ARGS, "array");

        # HOT-SPOT << you may define actions here

        # for example by using a Switch statement

        switch ($event)
        {
            case 'my_action1':
                # HOT-SPOT << code for action 'my_action1'
            break;
            case 'my_action2':
                # HOT-SPOT << code for action 'my_action2'
            break;
        }

        return true;
    }

    /**
     * Type: read
     * Permission: 0
     * Templates: index entries
     *
     * @param array $ARGS array of params passed to the function
     * @return boolean
     */
    function guestbook_read_entries ($ARGS)
    {
        # HOT-SPOT << code for action 'guestbook_read_entries'
    }

/* { ... } */

    /**
     * Type: write
     * Permission: 100
     * Templates: MESSAGE
     *
     * @param array $ARGS array of params passed to the function
     * @return boolean
     */
    function guestbook_write_write ($ARGS)
    {
        # HOT-SPOT << code for action 'guestbook_write_write'
        $YANA->message("OK", "200");
    }

    function my_action ($ARGS)
    {
        # HOT-SPOT << code for action 'my_action'
    }
}
?>
All "Hot-Spots", where the developer can write own source code or supplement existing code, are emphasized in this brief example. The function "my_action" is to demonstrate, how you can add own actions to the interface of the class and thus to the plug-in. Take a look at the function "_default". This function is inherited from the parent class "plugin" and serves as default event handler, which catches all events, that are send to the plug-in, but do not have a public event handler (function) in the classe's interface. In addition this function intercepts special cases, like events where the corresponding function is not public, the function is the class constructor, or it is inherited from the base class "plugin" like the public function "toString()". For security reasons this also applies to inherited functions which are reimplemented in the child class. The reason is, these methods are public. They are part of a common interface of all classes who inherit from the parent class "plugin". Thus the functionality of these functions is guaranteed by the given semantics of the base class. These semantics should be kept in the child class.
In order to create a function, which is not to part of the public interface, mark the function as "private".
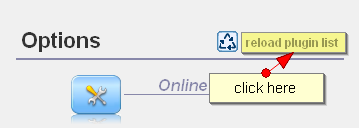
Please note: you need to refresh the plug-in cache to enable new functions. To do so, log in as administrator, open the administration menu and click "reload list".
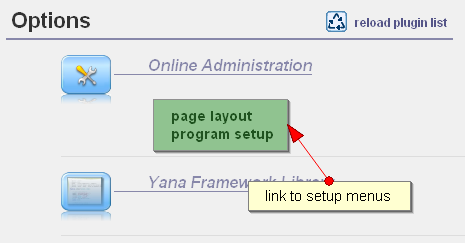
The "setup" menus can be found in the column "options" (left) of the administration menu, as shown in the following illustration.
To create such a menu and setup, it is enough to first: add an entry to the configuration file of the plug-in and second: create an HTML template. It is not necessary to write PHP code. Look at the following example of the configuration file of a plug-in:
File "plugins/example.config"

<INFO>
	/* first the mandatory data - these have nothing to do
	 * with the setup menu itself.
	 */
	<ID>foo</ID>
	<NAME>Foo plugin</NAME>
	<AUTHOR>Thomas Meyer</AUTHOR>
	<DESCRIPTION>my example</DESCRIPTION>
	<LOGO>%PLUGINDIR%foo/preview.jpg</LOGO>
	<IMAGE>%PLUGINDIR%foo/icon.png</IMAGE>
	<TYPE>primary</TYPE>
	/* Here come the entries for the setup menu */
	<SETUP>
		/* The following code will create an entry
		 * labeled "Foo Options" using the icon
		 * "plugins/foo/setup1.gif". By clicking the
		 * button "Setup", the action
		 * "foo_setup_1" is triggered.
		 */
		<0>
			<ACTION>foo_setup_1</ACTION>
			<TITLE>Foo Options</TITLE>
		</0>
		/* A second example: */
		<1>
			<ACTION>foo_setup_2</ACTION>
			<TITLE>Bar Options</TITLE>
		</1>
	</SETUP>
</INFO>

<INTERFACE>

	/* The actions "foo_setup_1" <und "foo_setup_2"
	 * are now associated with a template
	 */
	<foo_setup_1>
		/* TYPE=config defines, that this is a setup menu */
		<TYPE>config</TYPE>
		/* PERMISSION=100 restricts access to users
		 * with security level 100 - these are administrators.
		 */
		<PERMISSION>100</PERMISSION>
		/* foo_template_1 is the name of the template */
		<INSERT>foo_template_1</INSERT>
	</foo_setup_1>

	<foo_setup_2>
		<TYPE>config</TYPE>
		<PERMISSION>75</PERMISSION>
		<INSERT>foo_template_2</INSERT>
	</foo_setup_2>

	/* ... other actions might follow here ... */

</INTERFACE>
Now all you need is a HTML page containing a form, like in the following example:
File "skins/default/example.html"
<!-- Just copy the head of the file. Here is nothing
     to be edited. Copy'n'paste will be enough. -->

<!-- BEGIN: Head -->
<form method="POST" enctype="multipart/form-data" action="[%$PHP_SELF%]">
[%if !$ID%][%if $PERMISSION==100%]
	<input type="hidden" name="action" value="set_config_profile">
[%/if%][%else%]
	<input type="hidden" name="action" value="set_config_profile">
[%/if%]
	<input type="hidden" name="[%$SESSION_NAME%]" value="[%$SESSION_ID%]">
	<input type="hidden" name="id" value="[%$ID%]">
<!-- END: Head -->

<!-- Now the part where you need to fill your information -->

	<!-- adding a headline is a good idea: -->
	<h1>Setup</h1>

	<!-- a list of options -->
	<label>Option 1
	<!-- $PROFILE.OPT1 is the stored value of this field - if any value has been stored yet.
	     The modifier |entities ensures, that tags and quotes
	    are converted to HTML entities, so that
	     HTML syntax errors are avoided.
	 -->
	<input type="text" name="opt1" value="[%$PROFILE.OPT1|entities]">
	</label><br>

	<label>Option 2
	<input type="text" name="path.opt2" value="[%$PROFILE.PATH.OPT2|entities]">
	</label><br>

	<label>Option 3
	<input type="text" name="opt3" value="[%$PROFILE.OPT3|entities]">
	</label><br>

	<!-- don't forget the submit button -->
	<input type="submit" value="[%$LANGUAGE.BUTTON_SAVE%]">

</form>
This HTML page causes the following array to be stored on submission of the form:
<?php
$PROFILE = array(
    'opt1' => "foo",
    'path' => array(
        'opt2' => "bar"
    ),
    'opt3' => "foobar"
);
?>
You can access the stored options from within your plug-in as follows:
<?php
global $YANA;
$opt1 = $YANA->getVar('PROFILE.OPT1');
$path_opt2 = $YANA->getVar('PROFILE.PATH.OPT2');
$opt3 = $YANA->getVar('PROFILE.OPT3');
?>
To have the form "example.html" shown when clicking the button "setup", it needs to be associated with the action "foo_setup_1". This is done as follows:
File "skins/default/example.config"
<!-- First the template with the name "foo_template_1" is defined ... -->
<foo_template_1>
	<FILE>example.html</FILE>
</foo_template_1>

File "plugins/example.config"

...

<INTERFACE>

	<foo_setup_1>
		<TYPE>config</TYPE>
		<PERMISSION>100</PERMISSION>
	<!-- ... Next the template "foo_template_1" is associated with the action "foo_setup_1". -->
		<INSERT>foo_template_1</INSERT>
	</foo_setup_1>
...

</INTERFACE>
 Thomas Meyer, www.yanaframework.net
 Using a CAPTCHA